
Project Overview
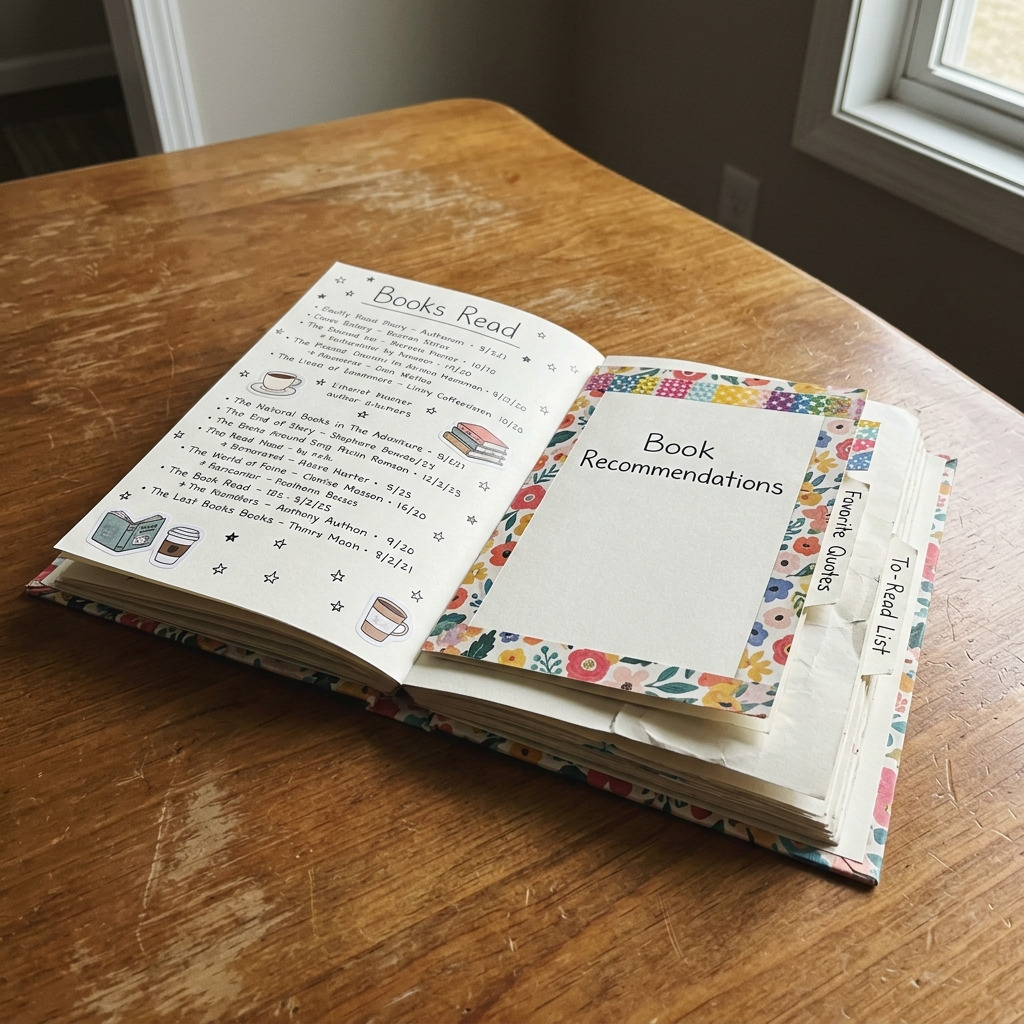
This DIY project transforms a plain notebook into a charming book log journal specifically designed to track reading habits and favorite books for cozy reading experiences. The finished journal serves as both a practical tool and a decorative item to enhance your reading journey.
Project at a Glance
- Time required: 1-2 hours active working time; total elapsed time approximately 1-2 hours
- Difficulty level: Beginner; skills required include basic cutting and gluing
- Estimated cost: $10 to $30 depending on decorative paper choice and additional embellishments
- Finished dimensions: Approximately 8.5 inches x 11 inches
- Yield: 1 book log journal
HERO IMAGE PLACEHOLDER
[Descriptive image caption of the finished project]
Materials and Tools
Materials
- Plain Notebook: 1 unit, A4 size (8.5 x 11 inches), preferably with lined pages; choose any solid color cover as per your preference
- Decorative Paper: 2 sheets, 12 x 12 inches, in cozy floral or literary patterns
- Adhesive: 1 bottle, craft glue or glue stick, approximately 30 ml
- Scissors: 1 pair, standard size for paper cutting
- Ruler: 1 unit, 12 inches
- Pencil: 1 unit for marking measurements
- Fine-tip Marker: 1 unit, black or colored (for headings and decorations)
- Washi Tape: 1 roll, in a complementary color or literary-themed design
- Stickers or Stamps: Optional, various designs per preference, book-themed or motivational quotes
Tools
- Cutting Mat: 1 unit (to protect surfaces during cutting)
- Bone Folder or Credit Card: 1 unit (for creasing and smoothing flat edges)
- Safety Equipment: Safety glasses to protect eyes during any cutting or crafting activities
Instructions
Preparing the Notebook
Step 1: Cover Customization (Optional)
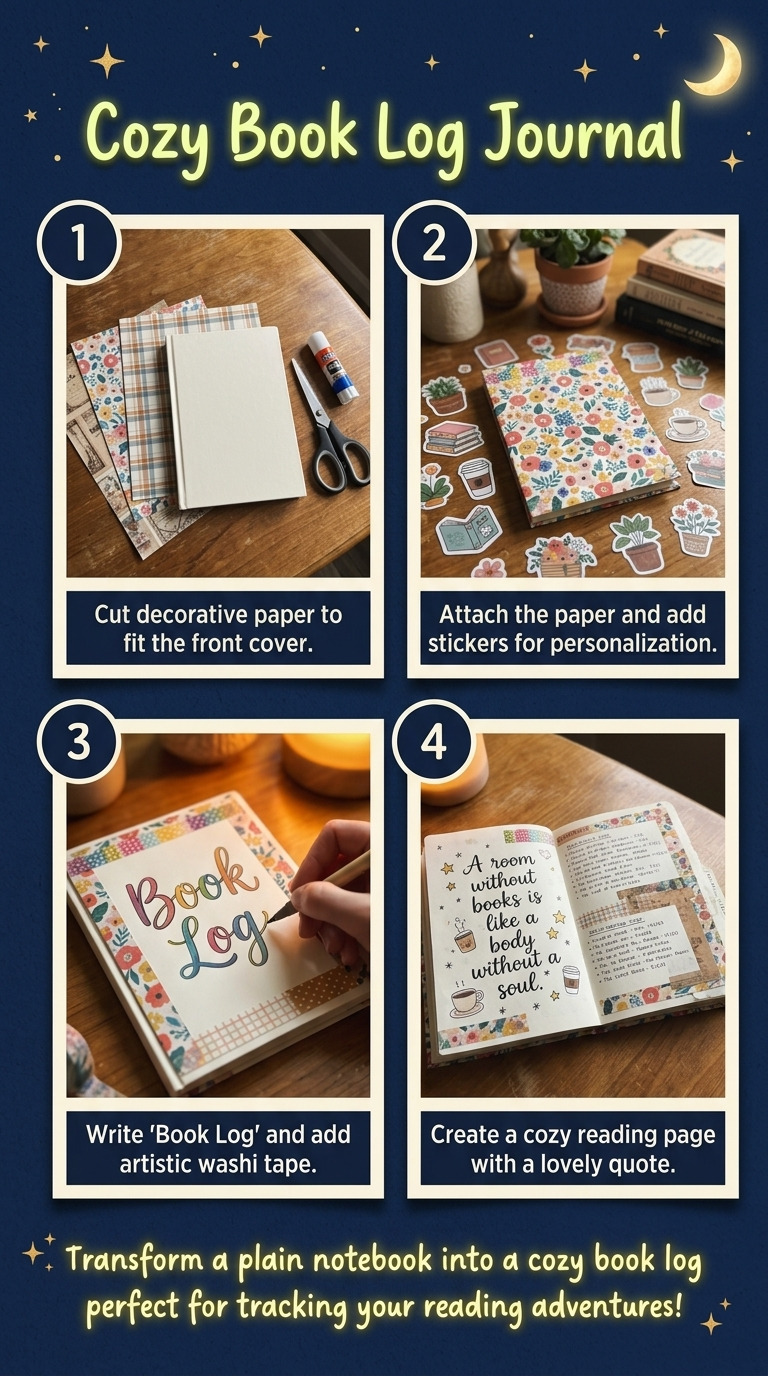
- Cut one piece of decorative paper to 8 x 10.5 inches.
- Apply glue on the back of the decorative paper. Center it on the notebook cover and press down firmly. Allow it to dry for 10 minutes. The cover should adhere smoothly without bubbles.
Step 2: Page Section Preparation
- Using your ruler and pencil, mark lines on the first pages to create headings for each section.
- “Books Read”
- “Book Recommendations”
- “Favorite Quotes”
- “To-Read List”
- Draw lines under each title with a fine-tip marker to create space for writing. The lines should be spaced evenly to allow for legible entries.
Assembling the Sections
Step 3: Create Dividers
- Cut leftover decorative paper into 8.5 x 5.5 inches for the dividers.
- Label each divider with the corresponding section title using a fine-tip marker. Ensure the labels are clear and centered for readability.
Step 4: Inserting the Dividers
- Insert the dividers into the notebook at the beginning of each new section.
- Use washi tape along the top edge of each divider page for added decorative flair, ensuring the tape lays flat and adheres well.
Step 5: Adding Stickers/Stamps
- Optionally, enhance the dividers or relevant pages with stickers or stamps that match the cozy reading theme. Placement should be balanced and aesthetically pleasing.
Assembly & Finishing
Step 6: Final Assembly
- Check that all dividers and decorative elements are secure and lay flat within the notebook. Confirm that transitions between sections are smooth and clear.
Step 7: Finishing Touches
- Optionally, add washi tape along the edges or corners of pages for a colorful accent and additional flair.
- Write personalized notes or motivational quotes on the first page as a preface to your book log journal. This can set a positive tone for your reading experience.
Measurements & Dimensions
- Finished Dimensions of Journal: 8.5 x 11 inches
- Dividers: 8.5 x 5.5 inches
- Decorative Paper for Cover: Cut to 8 x 10.5 inches
Timing Information
- Estimated active working time: 1-2 hours
- Drying/Curing time: 10-15 minutes for glue to set
- Total time: Approximately 1-2 hours, depending on decoration choices
Troubleshooting and FAQ
Troubleshooting
The decorative paper is bubbling. Cause: The glue was applied too thickly. Correction: Remove the paper and reapply with a thinner layer of glue, smoothing it out as you go.
The dividers don’t fit correctly. Cause: Incorrect measurements during cutting. Correction: Measure and cut the dividers again to match 8.5 x 5.5 inches accurately.
Washi tape won’t stick. Cause: The paper surface is not clean or dry. Correction: Ensure the surface is clean prior to application and consider using a stronger adhesive if necessary.
Pages are not aligning correctly. Cause: Incorrect insertion of dividers. Correction: Carefully remove the dividers and reinsert them ensuring they are placed correctly at the start of each section.
Frequently Asked Questions
Can I use a different size notebook? Yes, but the measurements for dividers will need to be adjusted based on the notebook size chosen. Maintain the same proportions for divider size relative to the notebook dimensions.
What if I don’t have decorative paper? You can use wrapping paper, old book pages, or even paint directly on the cover for a custom look. This will change the aesthetic but can still create a unique design.
Are there alternative dividers I can use? Yes, you can use cardboard or thin cardstock as dividers. This will create a sturdier feel; however, it may add bulk to the notebook.
How can I maintain my journal? Keep it in a dry area away from moisture, and avoid exposing it to direct sunlight for long periods to prevent fading. Use a soft cloth for cleaning.
Save This Guide
Save or pin this guide to Pinterest so you can reference the cut list, exact measurements, and drying times while you build your cozy reading book log journal. Feel free to share corrections, measured results, or substitutions that worked for you, so this guide can remain accurate and helpful.
Leave a Reply